Model Collector Magazine - How to Make Waterslide Decals Article
Decorate With Waterslide Decals
Model Collector Magazine
Routemaster
Simon Elmore reveals an inexpensive way to produce your own decals
Published by Model Collector
Before the introduction of printing to die-cast toys and models, the signs, emblems and adverts more often than not took the form of decals or waterslide transfers.
When restoring a die-cast model to its former glory, surely one must be as accurate as possible; so if the original model had decals then the restoration, if possible should also.
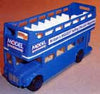
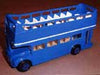
The reproduction decals on offer from model suppliers such as Steve Flowers are excellent and well priced, but for those who have an artistic streak it is remarkably easy to reproduce your own replacements. Alternatively, you can create your own individual model, like my MODEL COLLECTOR Routemaster pictured above.
- A Blank Canvas
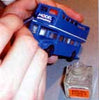
I am adding decals to an old Corgi open top bus that I found in my dad's strange collection. I have no idea why it was 'sans decals' but it was and just meant I had a blank canvas to work with!
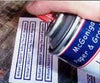
There are many suppliers of decal paper designed to work with a standard home inkjet printer. For information on acquiring some of this particular paper, see the details at the end of this article. All paper used here was kindly provided by mcgpaper.com
Two types of paper are available, clear and white. Clear decal paper leaves all uncoloured areas transparent. This paper is excellent, although it cannot produce designs with white in the colour scheme. However, there is also a white decal paper that leaves all uncoloured areas white. For this step-by-step I will be using the white decal paper, as I require a white background for some of my designs.
- Test sheets and printouts
As with the labels produced in the first part of this article it is paramount that the size of the decals is worked out precisely before they are applied. Firstly, design the decals in any presentation or art package (as shown in the January 2002 issue of MODEL COLLECTOR) and print out test sheets that can be cut out and checked against the model.
My test sheet was made up of the MODEL COLLECTOR logo already used on the Model A van and a long banner for the side of the bus stating the obvious: Britain's BIGGEST Selling Diecast Magazine'!
The banner was a simple dark blue-bordered rectangle surrounding a Lucida Casual text with a slight shadow. The designs were produced in various sizes and printed out on an A4 test sheet. When sizes were finalized we printed the designs onto the white decal paper, making sure we set all print options to print at best quality. Then the decals were left to dry for about ten minutes and cut into more manageable sheets with a couple of extra designs printed out just in case!

- Spraying and cutting
Produce a vanish-like layer that will stick to the design and act as a carrier film for the ink.
The spray I used came with the decal papers from McGonigal Paper & Graphics as part of a DIY Decals set.
It is important when spraying the decals that you create a balanced, thin and thorough coating to the surface.
Short sprays an a steady hand best produce this cover with the can held 8 inches away from the paper and moving in a slow side-to-side motion. Make sure that the room where you spray is very well ventilated and try not to get any of the spray on your hands. When all relevant decals have been covered, leave them to dry for 10 hours or as paper decal paper instructions.
For best results keep the decals at room temperature.
Our kit suggested a drying time of between 2 and 12 hours but use your own judgment.
Basically the decals will not suffer by being left to dry for too long, better to be safe than sorry!
- Knives and Tweezers
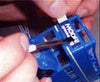
When the decals have completely dried they can be cut and soaked. As for COLLECTOR emblems and side banners, the best way of cutting them out is to use an artist's scalpel or knife, metal ruler and cutting board.
This method, if your knife is sharp, should produce a much straighter cut than scissors and there should be minimum finger- printing! With the benefit of hindsight, the knack of cutting these decals is to not leave any outline to the decal at all, an unwanted outline may distort the overall appearance and give an effect that looks a bit like the white border bleeding into the colour.
The cut decals must then be soaked to allow separation of the carrier film and backing. Before soaking starts make sure that you have the model, some tissue and an old, soft paintbrush handy, ready for the application.
The decals need to be fully immersed in a bowl of slightly warm water. It is my opinion that using tweezers eliminates the struggle of removing the decal from the water and thus helps to eliminate any separation before final application.
Depending on the paper you use, the soaking should only last a matter of seconds. My decals needed to be soaked for approximately 15 to 20 seconds. A good way to check if the decal is ready for application is to simply remove the decal after the allotted time and very gently rub between your fingers to see if backing and film are separating.
- Application
When the decal is ready, quickly yet carefully transfer it to the model. (My first decal was for the front of the bus, as shown.) Upon application, it is important to keep the decal relatively wet so that it can be moved.
Use a slightly damp, soft, old paintbrush, this will work as a moisturizer and will help to move the decal into position. With the damp paintbrush in hand, gently pry the backing away from the carrier film.
- Decal Coat
Once the decal is in a satisfactory position, lightly dab it with a small piece of tissue as this will help the decal to dry. Leave the positioned decal for a couple of minutes to allow the adhesion to become secure, and then apply a layer of Decal Coat which is a solution that improves adhesion between the decal and the surface, it also helps eliminate the decal shine and improve any visible decal outline.
A Brief Aside
My MODEL COLLECTOR bus has a smaller emblem on the back and one on each of the sides, along with an advertising banner. These are applied in just the same way and fixed in position using Decal Coat as well.
The Coat should be applied all over the decal in a thin layer, continuing the application to about 1 mm past each edge, thus providing a 'Coat border'. This application process can be repeated for as many decals as your model requires.